Tutorials
| This article is about the singleplayer menu. For the multiplayer menu, see Tutorials (multiplayer). |
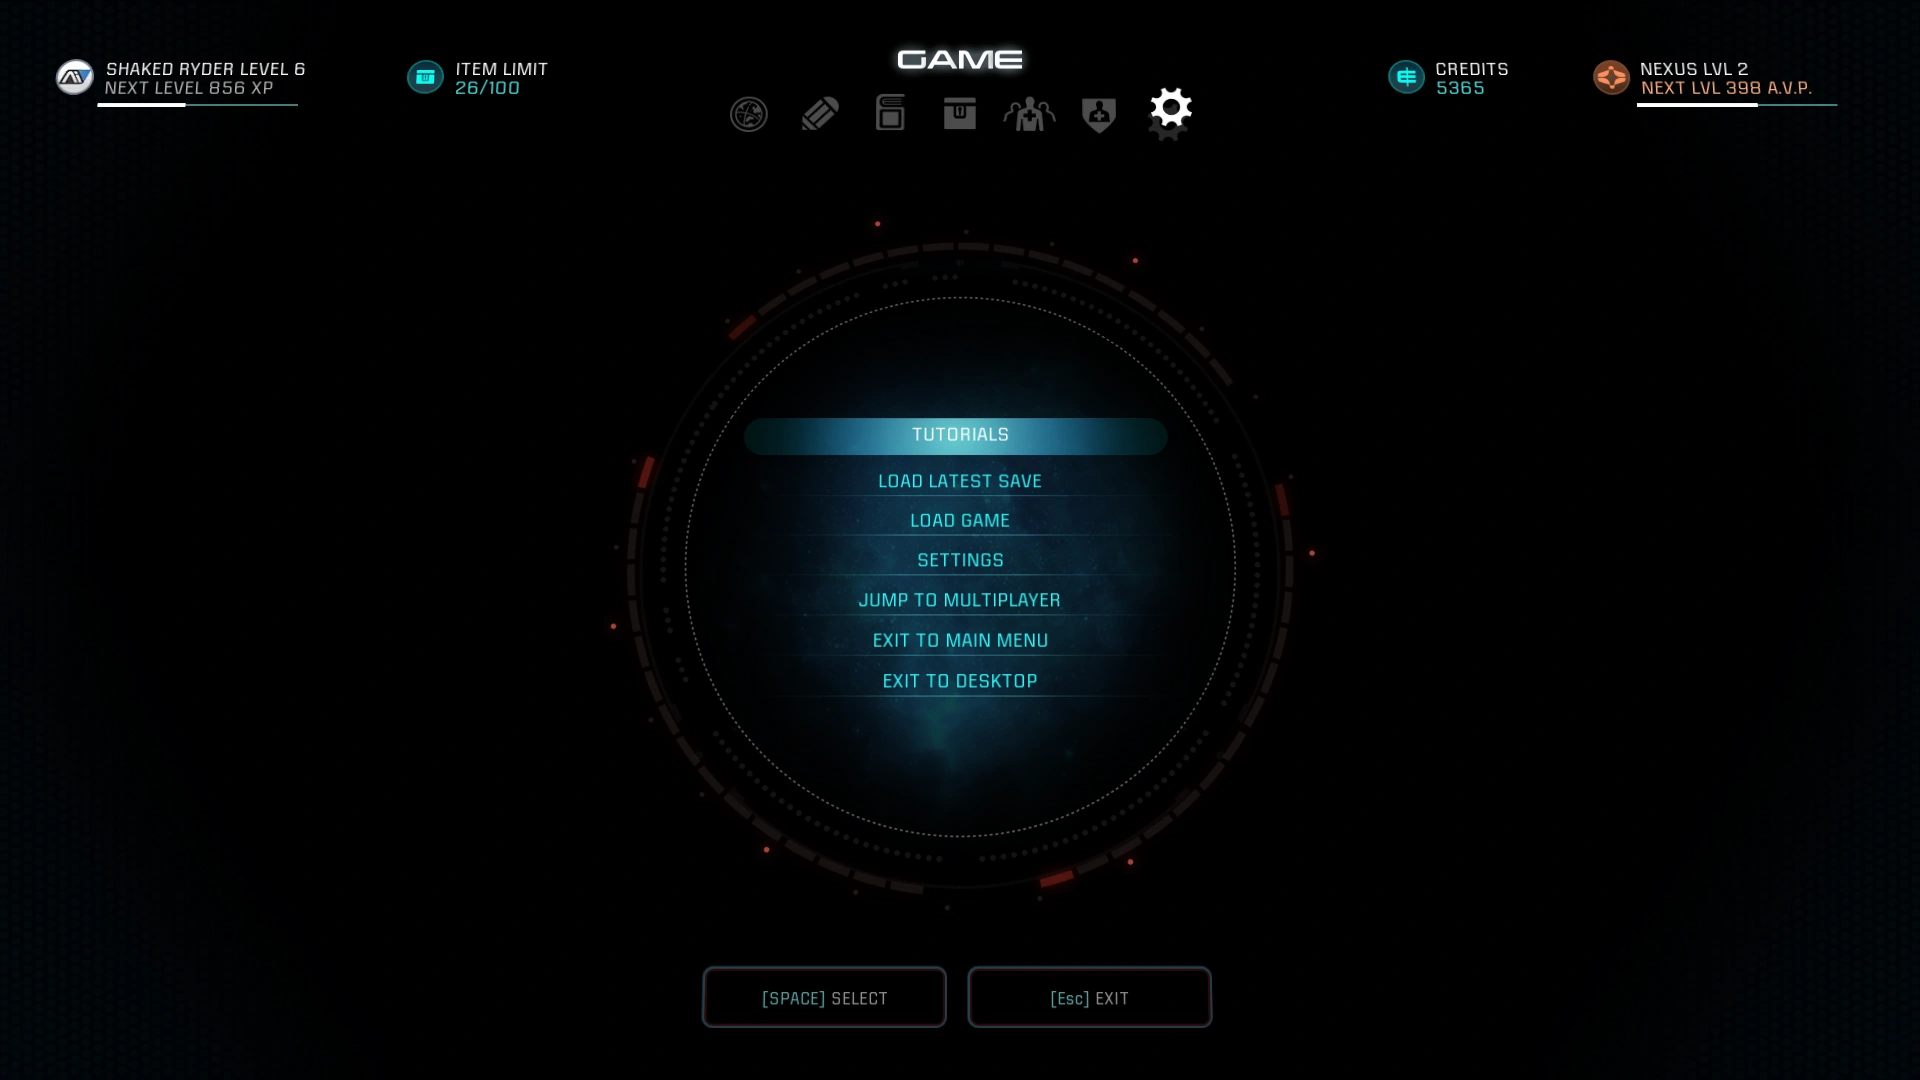
The Tutorials menu provides detailed information on the fundamental concepts of gameplay.
Overview[ | ]
The Tutorials menu can be directly accessed from the Game menu.
Depending upon the specific platform being used (PC, Xbox, or PS4), the button configurations change slightly in each tutorial category. The text listed below has been changed to (button) to represent those specific changes.
Camera and Movement[ | ]


Camera and Movement
LOOK: Use (button) to look around.
Tip: Press (button) if you need to re-center your camera as you explore.
WALK/RUN: Use (button) to move.
SPRINT: Press (button) while moving to start sprinting.
VAULT/MANTLE: To vault or climb over a low obstacle, move toward the object and press (button) when the prompt appears. If no prompt appears, that object can't be climbed.
JUMP: Press (button) to activate your jump-jets. Holding the button will allow for a higher jump.
Tip: You can jump farther if you're sprinting as you leap.
JUMP-MANTLE: If you hold (button) as you reach a solid ledge, you'll automatically grab onto it and boost yourself up.
EVADE: Move in a direction and press (button) to quickly evade danger.


Conversations[ | ]
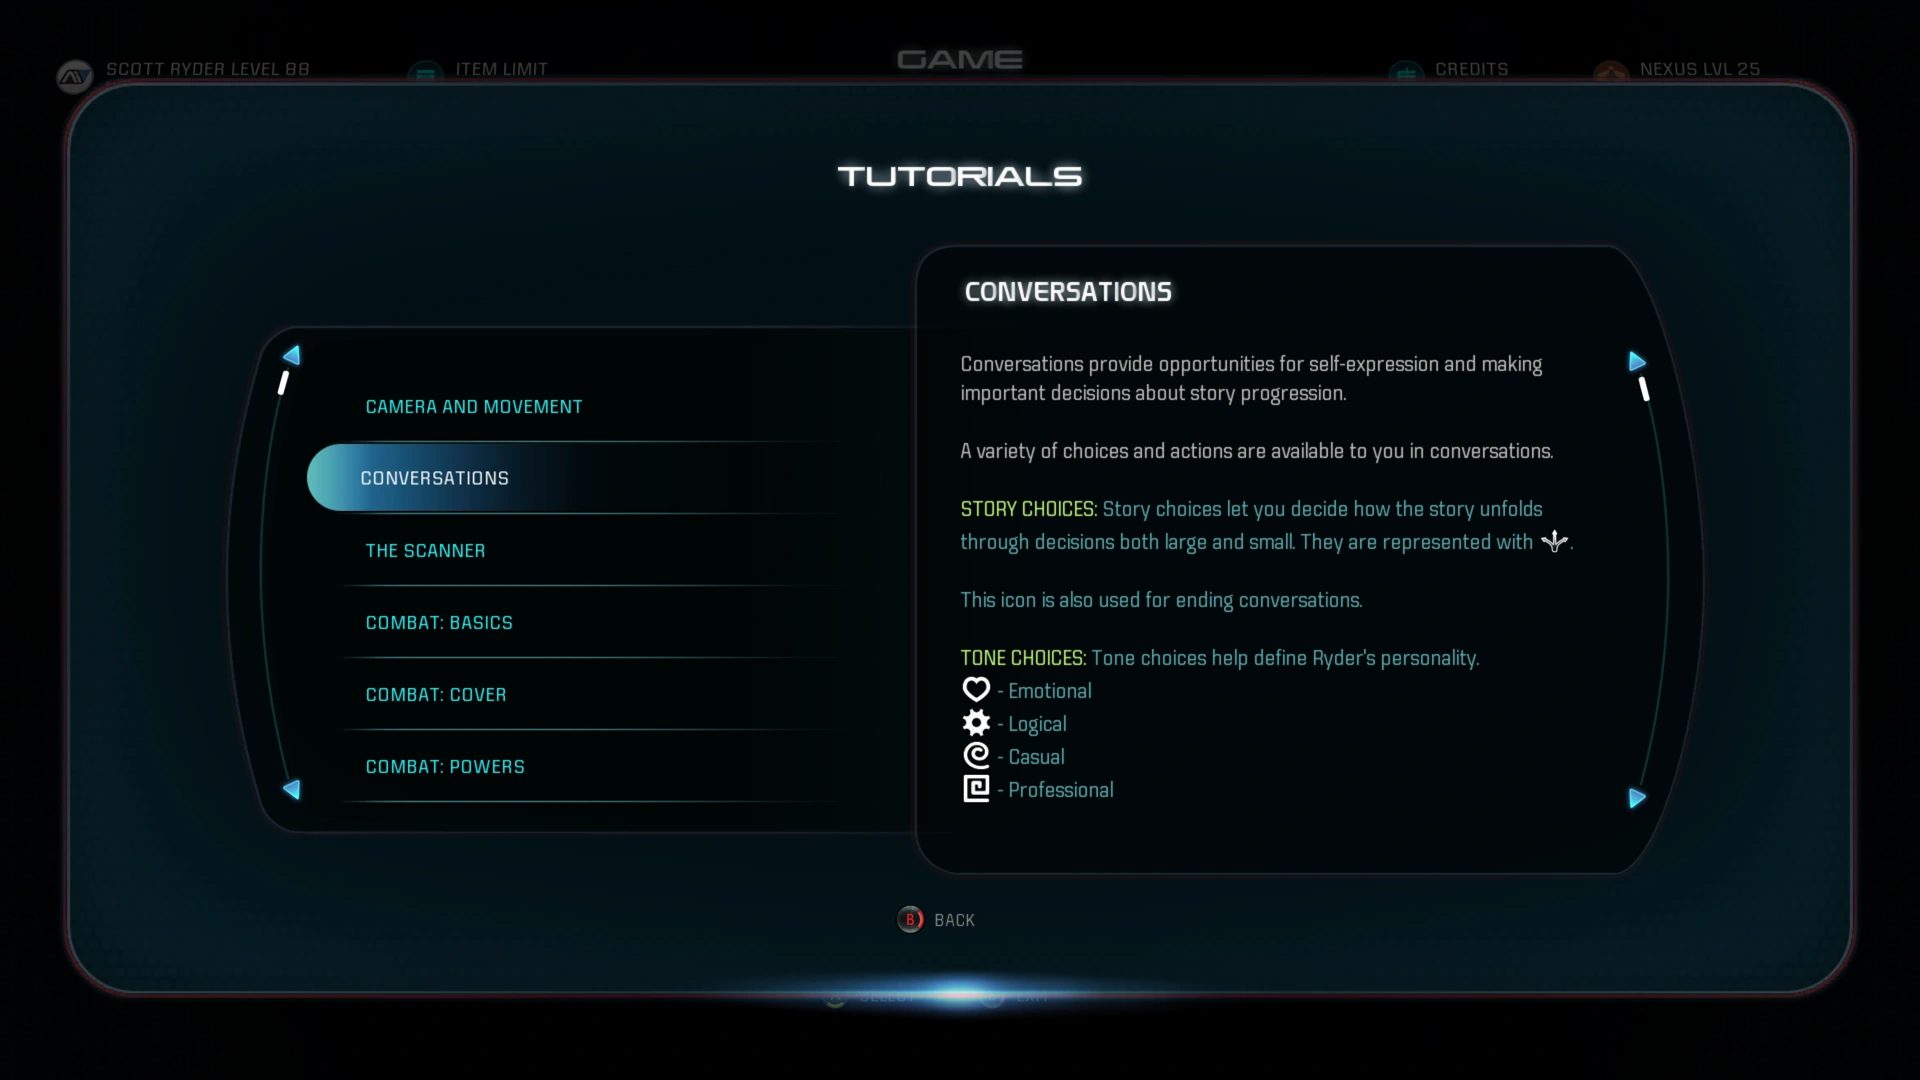

Conversations
Conversations provide opportunities for self-expression and making important decisions about story progression.
A variety of choices and actions are available to you in conversations.
STORY CHOICES: Story choices let you decide how the story unfolds through decisions both large and small. They are represented with ![]() .
.
This icon is also used for ending conversations.
TONE CHOICES: Tone choices help define Ryder's personality.
![]() - Emotional
- Emotional
![]() - Logical
- Logical
![]() - Casual
- Casual
![]() - Professional
- Professional
INVESTIGATIONS: At times, you may want to ask questions and get more information from a character before you make a decision. These options are represented by ![]() .
.
FRIENDSHIP AND FLIRTING: By choosing certain options, you can form close friendships with some characters or even pursue romances.
![]() - Friendship
- Friendship
![]() - Flirt
- Flirt
Tip: For some characters, friendship is a prerequisite for romance.
NARRATIVE ACTIONS: Narrative actions are prompts that can appear in the middle of a conversation. You have a limited window of time to decide if you want to perform the action displayed on screen.
If you want to take the action, press (button) before the timer runs out.
Tip: Check "The Journey So Far..." in the Journal for a breakdown of the major decisions, relationships, and unique personality you're crafted for Ryder.
SKIPPING: Most conversations and cinematics can be skipped by pressing (button).


The Scanner[ | ]


The Scanner
Your omni-tool's scanner allows you to gather valuable data on alien lifeforms, unknown technologies, and other items.
Additionally, it can serve as a diagnostic or forensic tool to aid in field repairs or investigations.
OPENING THE SCANNER: Press (button) to activate your scanner.
An orange highlight will appear when an object or lifeform is potentially scannable and you're within scanner range.
SCANNING: Press (button) to scan.
RESEARCH DATA: When scanning new lifeforms and tech, you may earn Research Data (RD). Data can be spent at a Research Center to unlock blueprints and augmentations for crafting. How much RD you've acquired is displayed at the bottom of your scanner.
There are three different types of RD.
- Milky Way: Data related to the colonists and their equipment.
- Heleus: Data related to the various races discovered in Andromeda.
- Remnant: Data related to the mysterious abandoned technology.
CLOSING THE SCANNER: Press (button) to close the scanner.
Tip: Attacking or being attacked will automatically close the scanner.


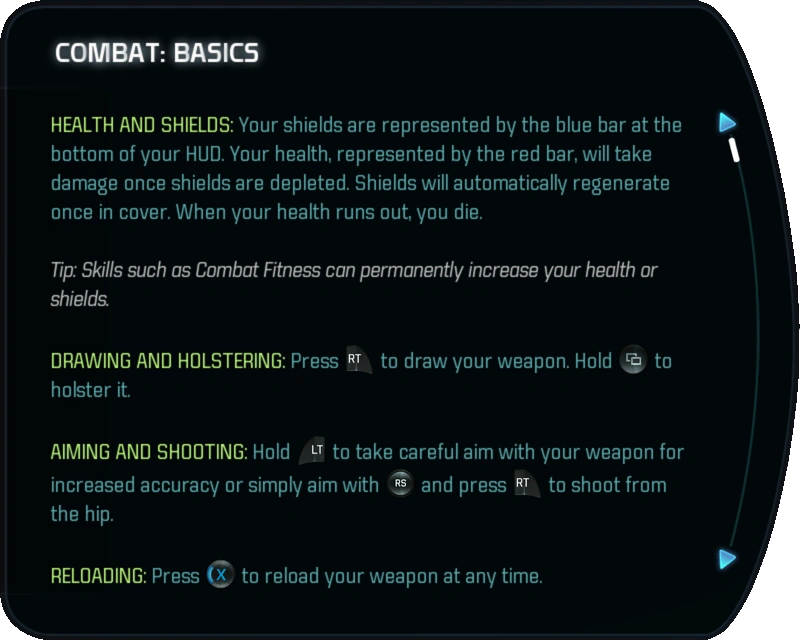
Combat: Basics[ | ]


Combat: Basics
HEALTH AND SHIELDS: Your shields are represented by a blue bar at the bottom of your HUD. Your health, represented by the red bar, will take damage once shields are depleted. Shields will automatically regenerate once in cover. When your health runs out, you die.
Tip: Skills such as Combat Fitness can permanently increase your health or shields.
DRAWING AND HOLSTERING: Press (button) to draw your weapon. Hold (button) to holster it.
AIMING AND SHOOTING: Hold (button) to take careful aim with your weapon for increased accuracy or simply aim with (button) and press (button) to shoot from the hip.
RELOADING: Press (button) to reload you weapon at any time.
MELEE: Press (button) to attack with your equipped melee weapon. Melee attacks are general most effective against unarmored, unshielded foes.
WEAPON SWAP: Hold (button) to quickly swap between the two weapons you used last.

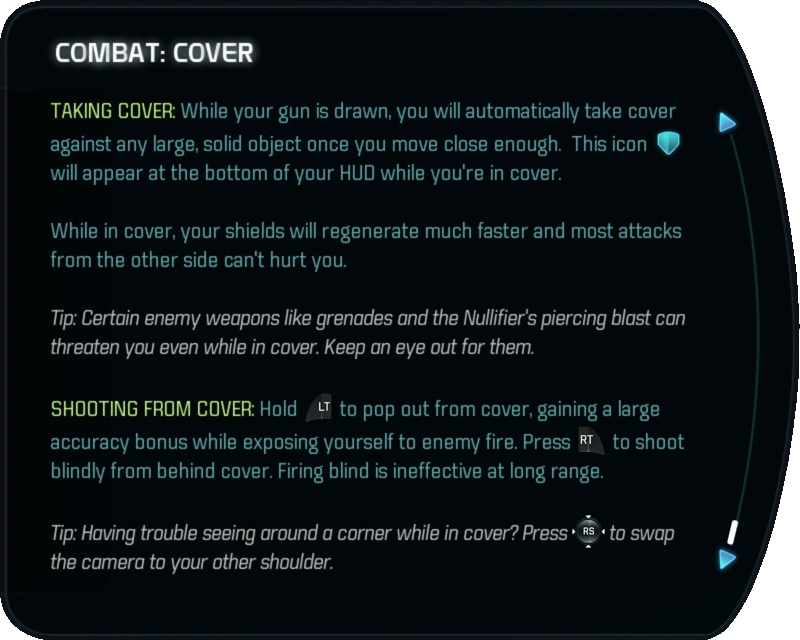
Combat: Cover[ | ]
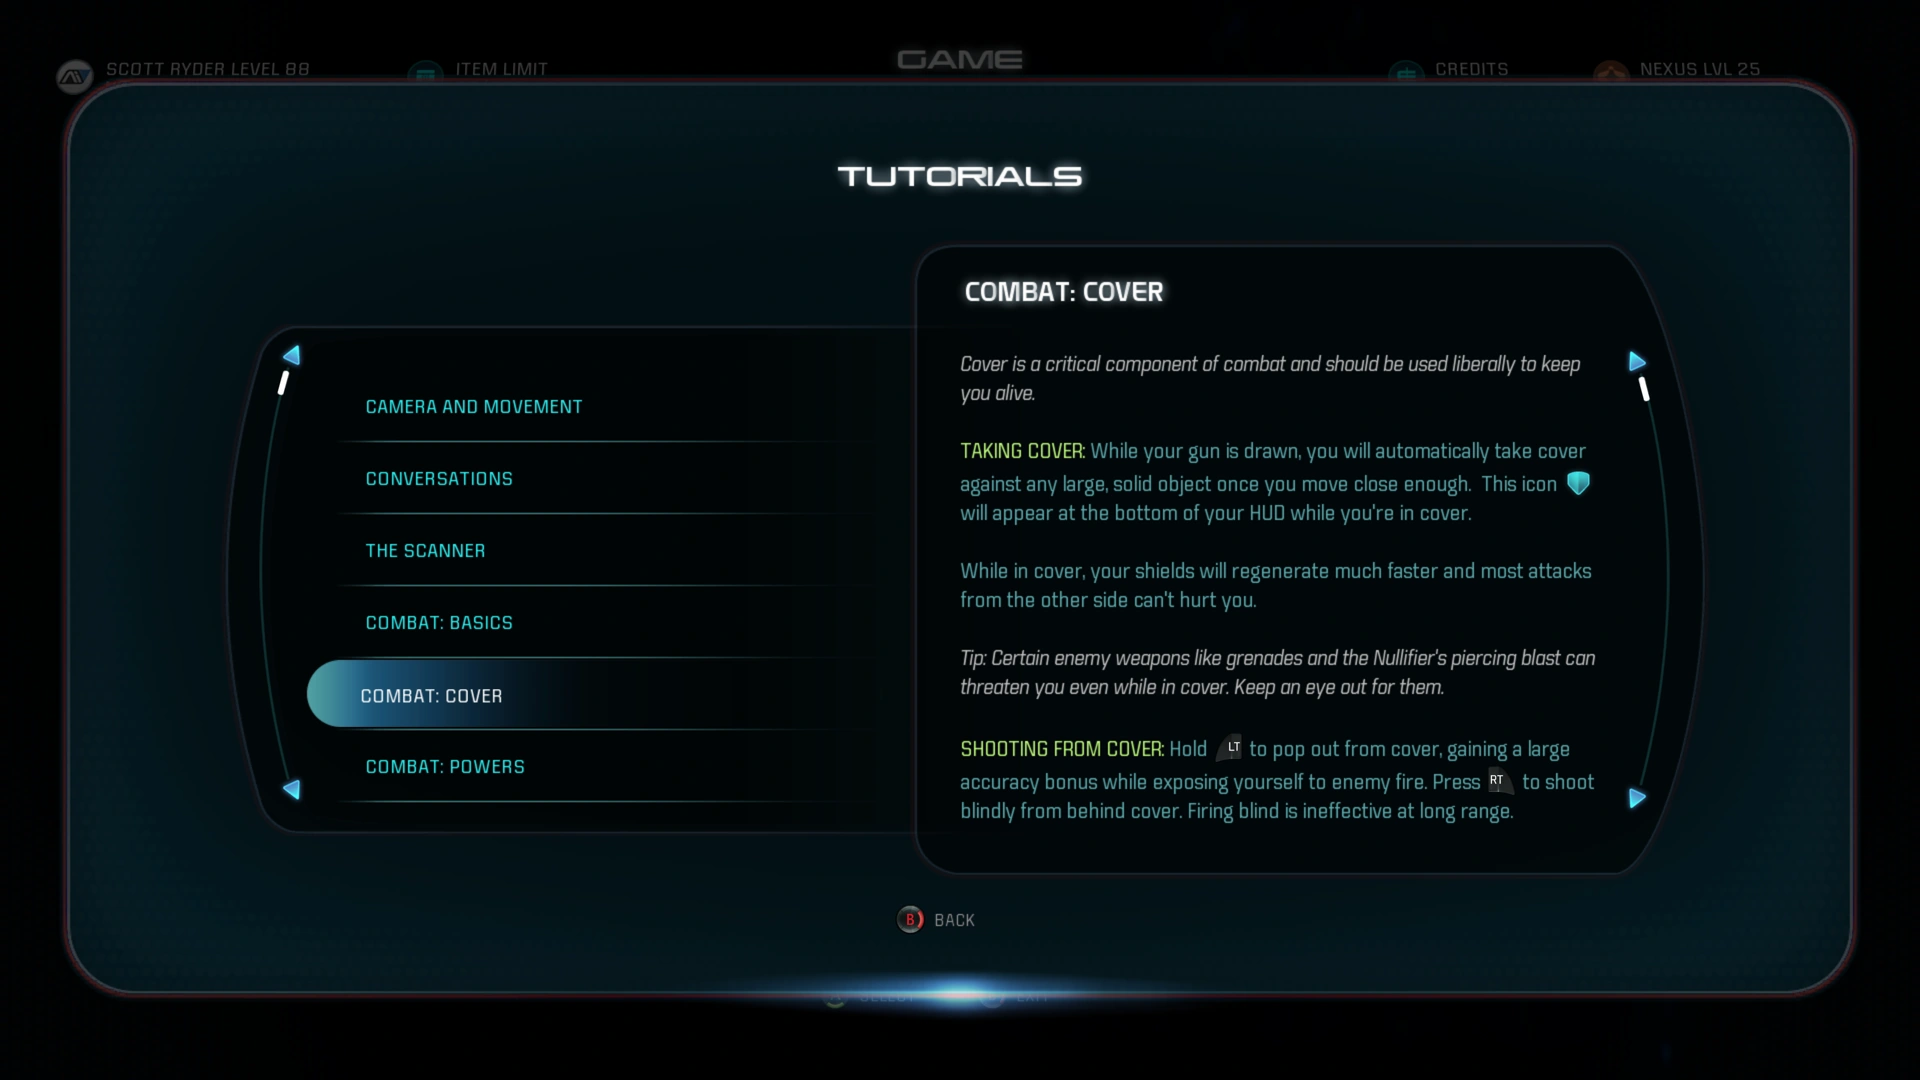

Combat: Cover
Cover is a critical component of combat and should be used liberally to keep you alive.
TAKING COVER: While your gun is drawn, you will automatically take cover against any large, solid object once you move close enough. This icon ![]() will appear at the bottom of your HUD while you're in cover.
will appear at the bottom of your HUD while you're in cover.
While in cover, your shields will regenerate much faster and most attacks from the other side can't hurt you.
Tip: Certain enemy weapons like grenades and the Nullifier's piercing blast can threaten you even while in cover. Keep an eye out for them.
SHOOTING FROM COVER: Hold (button) to pop out from cover, gaining a large accuracy bonus while exposing yourself to enemy fire. Press (button) to shoot blindly from behind cover. Firing blind is ineffective at long range.
Tip: Having trouble seeing around a corner while in cover? Press (button) to swap the camera to your other shoulder.

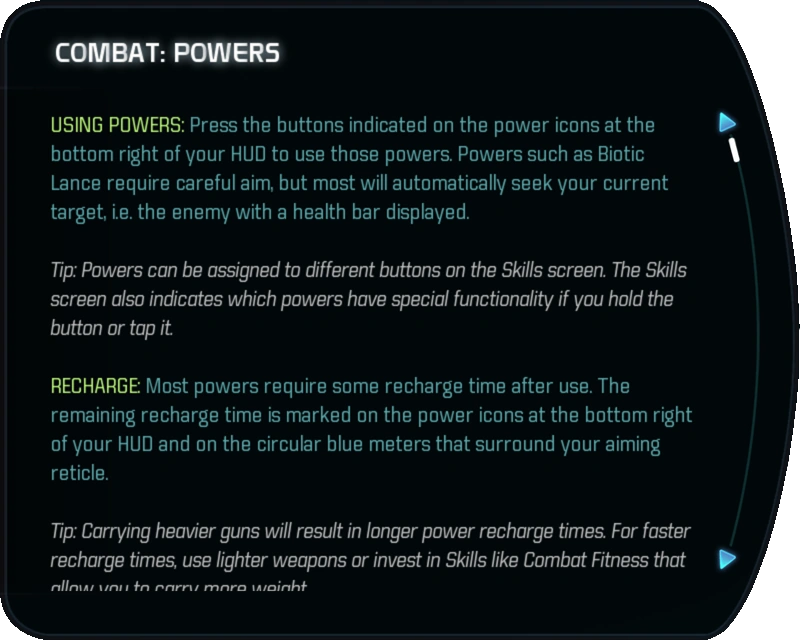
Combat: Powers[ | ]


Combat: Powers
USING POWERS: Press the buttons indicated on the power icons at the bottom right of your HUD to use your powers. Powers such as Biotic Lance require careful aim, but most will automatically seek your current target, i.e. the enemy with a health bar displayed.
Tip: Powers can be assigned to different buttons on the Skills screen. The Skills screen also indicates which powers have special functionality if you hold the button or tap it.
RECHARGE: Most powers require some recharge time after use. The remaining recharge time is marked on the power icons at the bottom right of your HUD and on the circular blue meters that surround your aiming reticle.
Tip: Carrying heavier guns will result in longer power recharge times. For faster recharge times, use lighter weapons or invest in Skills like Combat Fitness that allow you to carry more weight.
POWER CELLS: Powers such as Omni Grenade have no recharge time, but rely on disposable power cells. The remaining cells for any given power can be seen on the icons at the bottom right side of your HUD.
Tip: More power cells can be acquired from supply caches or forward stations.

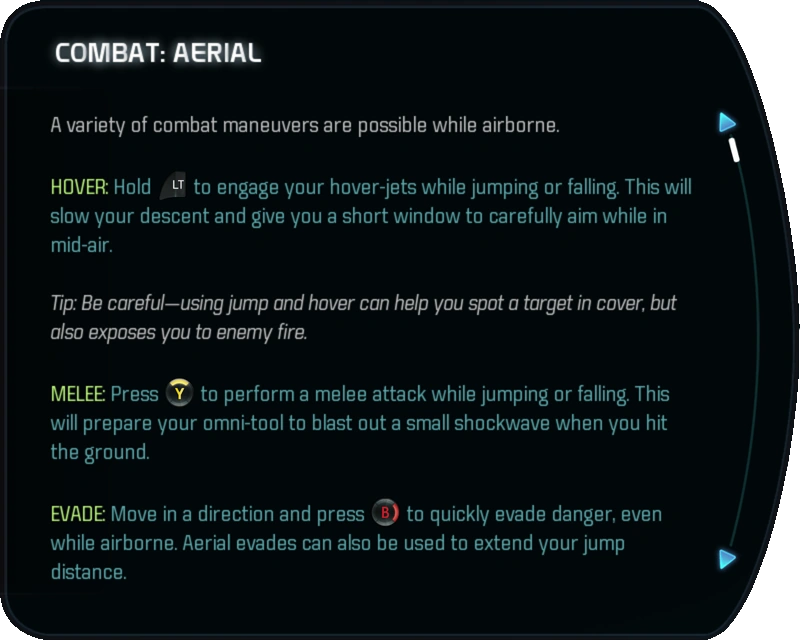
Combat: Aerial[ | ]


Combat: Aerial
A variety of combat maneuvers are possible while airborne.
HOVER: Hold (button) to engage your hover-jets while jumping or falling. This will slow your decent and give you a short window to carefully aim while in mid-air.
Tip: Be careful—using jump and hover can help you spot a target in cover, but also exposes you to enemy fire.
MELEE: Press (button) to perform a melee attack while jumping or falling. This will prepare your omni-tool to blast out a small shockwave when you hit the ground.
EVADE: Move in a direction and press (button) to quickly evade danger, even while airborne. Aerial evades can also be used to extend your jump distance.
POWERS: Most powers can be used while airborne, either firing in mid-air or at the moment you hit the ground. Try experimenting.

Combat: Enemy Defenses[ | ]


Combat: Enemy Defenses
Some enemies have defenses which protect them from certain attacks, or weak points that can be exploited.
HEALTH: Enemies with a red health bar have no special defenses.
ARMOR: Enemies with a yellow health bar have armor and are tougher to take down.
Tip: Single-shot weapons and flame-based attacks are particularly good for wearing down armor.
SHIELDS: Enemies with blue health bars are shielded. You must eliminate their shields before you can deplete their health. Shields will regenerate after not taking damage for a short time, so keep the pressure on.
Tip: Overload, Energy Drain, and beam or plasma-based weapons are effective at taking down shields.
LIFT AND KNOCKDOWN: Enemies with armor or shields can't be knocked down or lifted into the air with biotics.
SPECIAL DEFENSES: Powerful enemies may have physical or energy-based barriers that are impervious to your attacks. Look for a way to strike around their protective barrier or disable it entirely.
HEADSHOTS AND WEAK POINTS: Most enemies have spots on their body which are particularly vulnerable. On humanoids, this is often the head. Target different parts of your foes to discover their weak points and effectively deal extra damage.
Tip: Sniper rifles excel at targeting weak points.


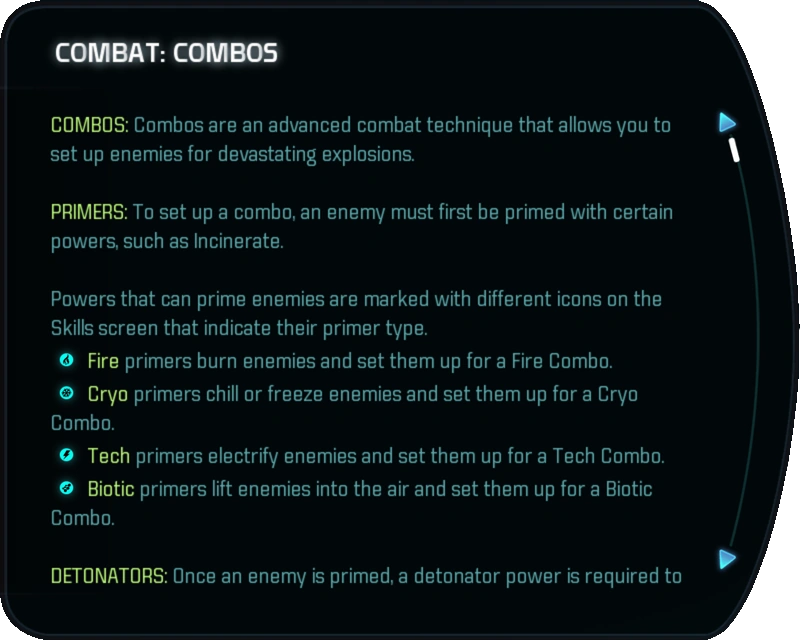
Combat: Combos[ | ]

Combat: Combos
COMBOS: Combos are an advanced combat technique that allows you to set up enemies for devastating explosions.
PRIMERS: To set up a combo, an enemy must first be primed with certain powers, such as Incinerate.
Powers that can prime enemies are marked with different icons on the Skills screen that indicate their primer type.
![]() Fire primers burn enemies and set them up for a Fire Combo.
Fire primers burn enemies and set them up for a Fire Combo.
![]() Cryo primers chill or freeze enemies and set them up for a Cryo Combo.
Cryo primers chill or freeze enemies and set them up for a Cryo Combo.
![]() Tech primers electrify enemies and set them up for a Tech Combo.
Tech primers electrify enemies and set them up for a Tech Combo.
![]() Biotic primers lift enemies into the air and set them up for a Biotic Combo.
Biotic primers lift enemies into the air and set them up for a Biotic Combo.
DETONATORS: Once and enemy is primed, a detonator power is required to set off a combo explosion. Detonator powers are marked with a ![]() icon on the Skills screen.
icon on the Skills screen.
Any detonator power will set off a combo—the type of explosion you get is determined by the primer.
COMBO TYPES:
- Fire Combos set every enemy in the area on fire.
- Cryo Combos slow or freeze nearby enemies.
- Tech Combos create a lingering electrical discharge that stuns enemies.
- Biotic Combos detonate with extreme force, sending enemies flying.
Tip: Many powers can be evolved to become a primer, a detonator, or even both. Look for the primer and detonator icons when planning your Skill purchases.

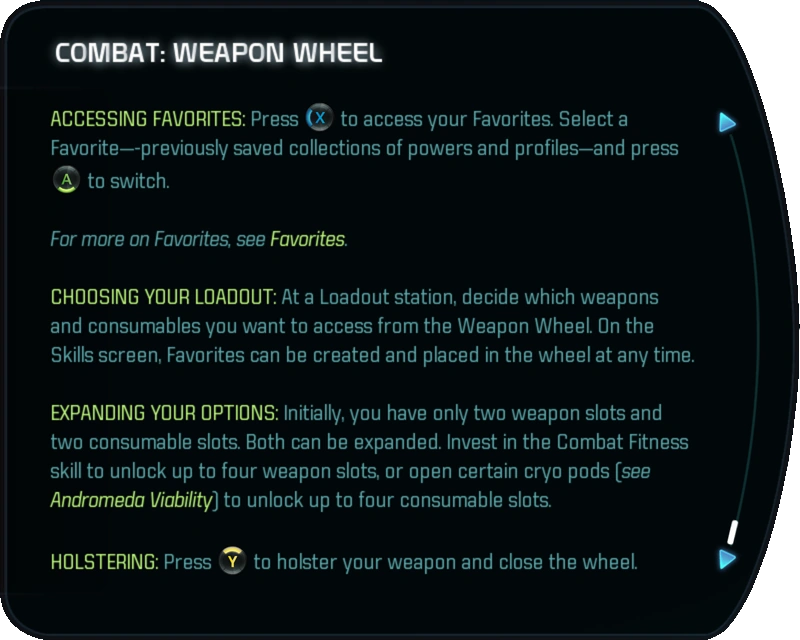
Combat: Weapon Wheel[ | ]


Combat: Weapon Wheel
The weapon wheel allows you to pause the game during combat to change weapons, use consumables, or switch between Favorites. It is available whenever you are wearing combat armor.
ACCESSING THE WHEEL: Press (button) to open the Weapon Wheel.
CHANGING WEAPONS: Select a weapon from the top of the wheel and press (button) to equip it and close the wheel.
USING CONSUMABLES: Select a consumable from the bottom of the wheel and press (button) to use it. Consumables help you in battle, from boosting your shields to enhancing your guns.
Tip: Consumables have a cooldown time, so you must close the wheel and wait several seconds before you can use another.
ACCESSING FAVORITES: Press (button) to access your Favorites. Select a Favorite—-previously saved collections of powers and profiles—and press (button) to switch.
For more on Favorites, see Favorites.
CHOOSING YOUR LOADOUT: At a Loadout station, decide which weapons and consumables you want to access from the Weapon Wheel. On the Skills screen, Favorites can be created and placed in the wheel at any time.
EXPANDING YOUR OPTIONS: Initially, you have only two weapon slots and two consumables slots. Both can be expanded. Invest in the Combat Fitness skill to unlock up to four weapon slots, or open certain cryo pods (see Andromeda Viability) to unlock up to four consumables slots.
HOLSTERING: Press (button) to holster your weapon and close the wheel.

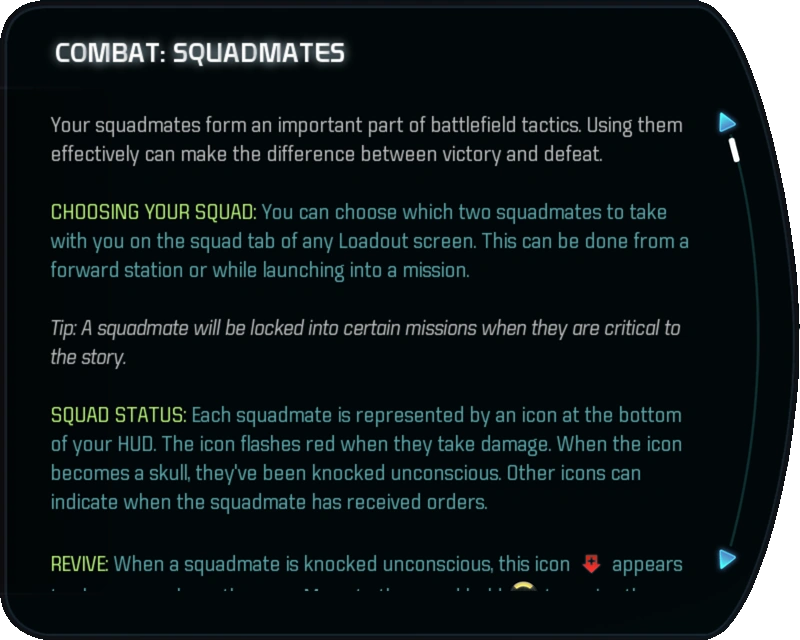
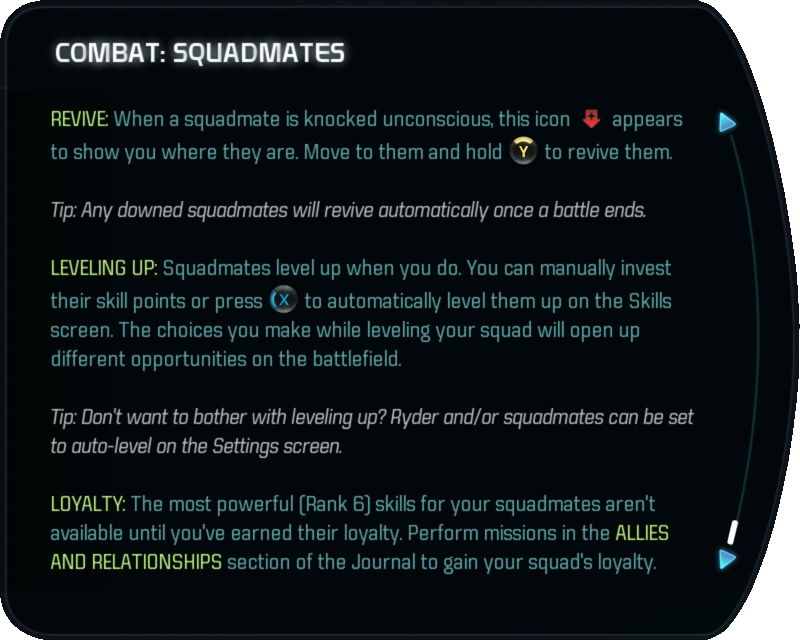
Combat: Squadmates[ | ]


Combat: Squadmates
Your squadmates form an important part of the battlefield tactics. Using them effectively can make the difference between victory and defeat.
CHOOSING YOUR SQUAD: You can choose which two squadmates to take with you on the squad tab of any Loadout screen. This can be done from a forward station or while launching into a mission.
Tip: A squadmate will be locked into certain mission when they are critical to the story.
SQUAD STATUS: Each squadmate is represented by an icon at the bottom of your HUD. The icon flashes red when they take damage. When the icon becomes a skull, they've been knocked unconscious. Other icons can indicate when the squadmate has received orders.
REVIVE: When a squadmate is knocked unconscious, this icon ![]() appears to show you where they are. Move to them and hold (button) to revive them.
appears to show you where they are. Move to them and hold (button) to revive them.
Tip: Any downed squadmates will revive automatically once a battle ends.
LEVELING UP: Squadmates level up when you do. You can manually invest their skill points or press (button) to automatically level them up on the Skills screen. The choices you make while leveling your squad will open up different opportunities on the battlefield.
Tip: Don't want to bother with leveling up? Ryder and/or squadmates can be set to auto-level on the Settings screen.
LOYALTY: The most powerful (Rank 6) skills for your squadmates aren't available until you've earned their loyalty. Perform missions in the ALLIES AND RELATIONSHIPS section of the Journal to gain your squad's loyalty.
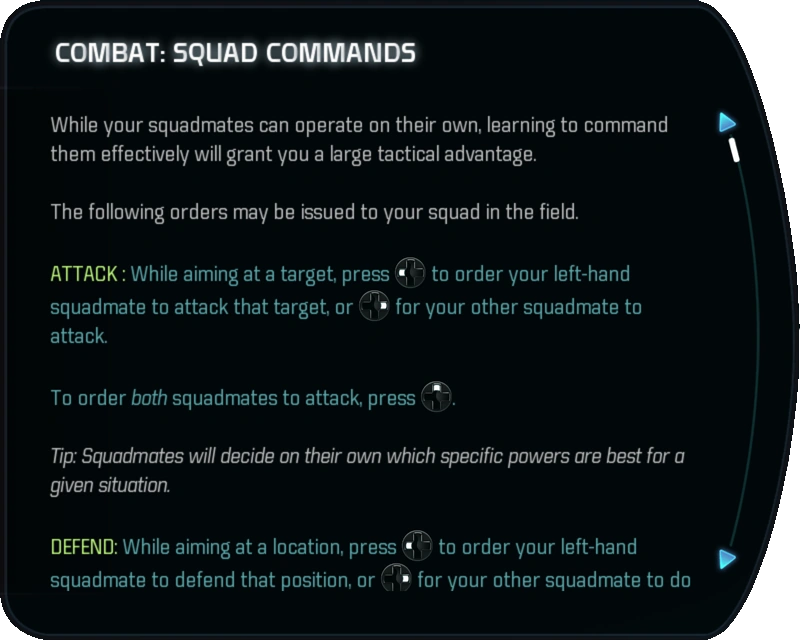
Combat: Squad Commands[ | ]


Combat: Squad Commands
While your squadmates can operate on their own, learning to command them effectively will grant you a large tactical advantage.
The following orders may be issued to your squad in the field.
ATTACK: While aiming at a target, press (button) to order your left-hand squadmate to attack that target, or (button) for your other squadmate to attack.
To order both squadmates to attack, press (button).
Tip: Squadmates will decide on their own which specific powers are best for a given situation.
DEFEND: While aiming at a location, press (button) to order your left-hand squadmate to defend that position, or (button) for your other squadmate to do so.
To order both squadmates to defend a location, press (button).
Tip: Your squadmates will use available cover near the spot you targeted.
RALLY: Hold (button) to tell your left-hand squadmate to stop what they're doing and return to you, or hold (button) for your other squadmate to do so.
To order both squadmates to rally to you, hold (button).

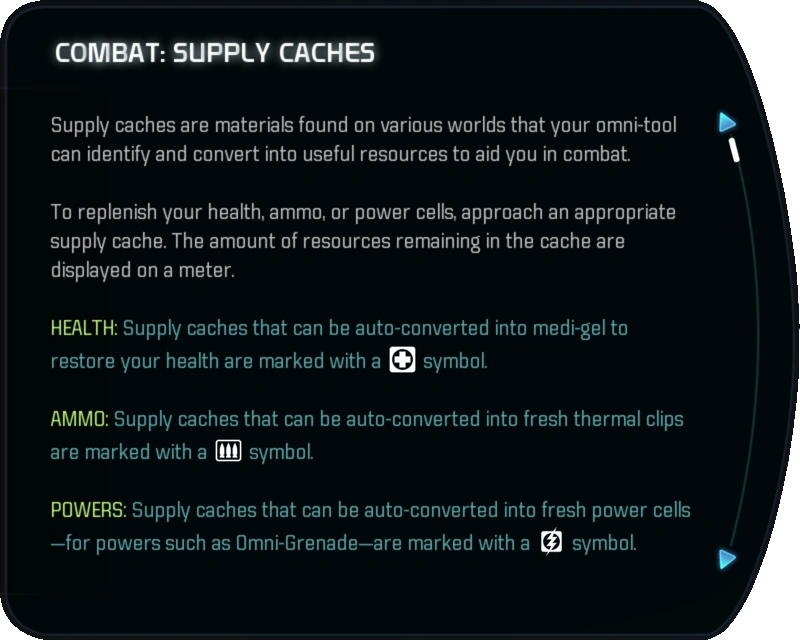
Combat: Supply Caches[ | ]


Combat: Supply Caches
Supply caches are materials found on various worlds that your omni-tool can identify and convert into useful resources to aid you in combat.
To replenish your health, ammo, or power cells, approach an appropriate supply cache. The amount of resources remaining in the cache are displayed on a meter.
HEALTH: Supply caches that can be auto-converted into medi-gel to restore your health are marked with a ![]() symbol.
symbol.
AMMO: Supply caches that can be auto-converted into fresh thermal clips are marked with a ![]() symbol.
symbol.
POWERS: Supply caches that can be auto-converted into fresh power cells—for powers such as Omni-Grenade—are marked with a ![]() symbol.
symbol.
Tip: Some supply caches can provide both thermal clips and power cells. Look for both symbols together.

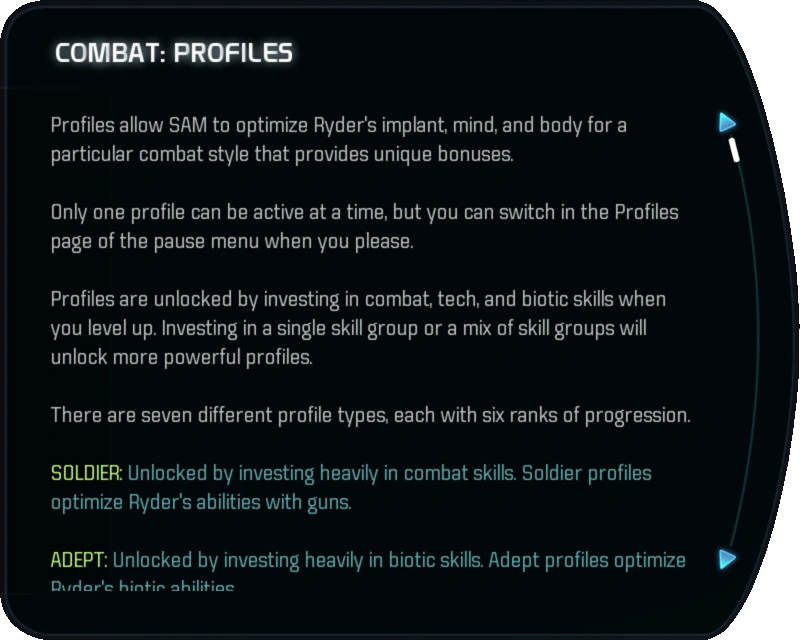
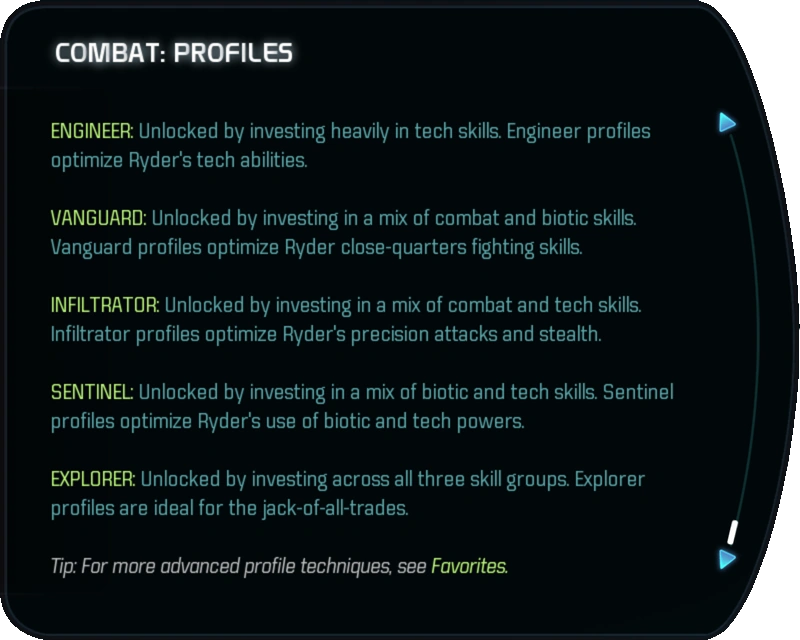
Combat: Profiles[ | ]


Combat: Profiles
Profiles allow SAM to optimize Ryder's implant, mind, and body for a particular combat style that provides unique bonuses.
Only one profile can be active at a time, but you can switch in the Profiles page of the pause menu when you please.
Profiles are unlocked by investing in combat, tech, and biotic skills when you level up. Investing in a single skill group or a mix of skill groups will unlock more powerful profiles.
There are seven different profile types, each with six ranks of progression.
SOLDIER: Unlocked by investing heavily in combat skills. Soldier profiles optimize Ryder's abilities with guns.
ADEPT: Unlocked by investing heavily in biotic skills. Adept profiles optimize Ryder's biotic abilities.
ENGINEER: Unlocked by investing heavily in tech skills. Engineer profiles optimize Ryder's tech abilities.
VANGUARD: Unlocked by investing in a mix of combat and biotic skills. Vanguard profiles optimize Ryder close-quarters fighting skills.
INFILTRATOR: Unlocked by investing in a mix of combat and tech skills. Infiltrator profiles optimize Ryder's precision attacks and stealth.
SENTINEL: Unlocked by investing in a mix of biotic ad tech skills. Sentinel profiles optimize Ryder's use of biotic and tech powers.
EXPLORER: Unlocked by investing across all three skills groups. Explorer profiles are ideal for the jack-of-all-trades.
Tip: For more advanced profile techniques, see Favorites.

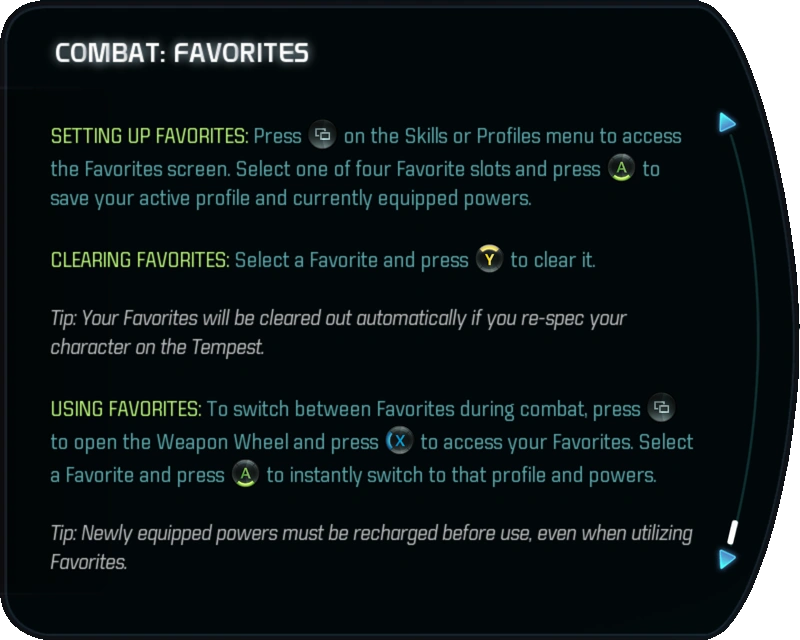
Combat: Favorites[ | ]


Combat: Favorites
Favorites are saved collections of one profile and up to three powers. You can switch profiles in the midst of combat.
Use favorites for easy switching between different play styles or to expand your selection of powers for a particular play style.
SETTING UP FAVORITES: Press (button) on the Skills or Profiles menu to access the Favorites screen. Select one of four Favorites slots and press (button) to save your active profile and currently equipped powers.
CLEARING FAVORITES: Select a Favorite and press (button) to clear it.
Tip: Your Favorites will be cleared out automatically if you re-spec your character on the Tempest.
USING FAVORITES: To switch between Favorites during combat, press (button) to open the Weapon Wheel and press (button) to access your Favorites. Select a Favorite and press (button) to instantly switch to that profile and powers.
Tip: Newly equipped powers must be recharged before use, even when utilizing Favorites.

Andromeda Viability[ | ]


Andromeda Viability
Andromeda Viability Points (AVP) represent the collective integrity of your colonization efforts in Heleus.
Earn enough AVP and your Nexus Level will increase, allowing you to open cryo pods and awaken more colonists from cryo sleep.
EARNING AVP: Earn AVP by scouting planets, making allies, defeating threats, repairing damaged environments, and other actions that make Andromeda a better home.
Tip: Earning AVP while on a potential colony world will also increase the viability of that world. See Planetary Viability for more info.
NEXUS LEVELS & CCP: Earn enough AVP and you'll hit thresholds—also called Nexus Levels—where the Nexus infrastructure improves and more colonists can be woken from cryo sleep.
Each time the Nexus "levels up," you'll earn one Cryo Pod Point (CCP) that can be used to open a cryo pod of your choice.
Tip: You can see your progress toward the next Nexus Level and the viability of individual worlds on the Viability screen. Press (button) from the pause menu to access it.
CHOOSING CRYO PODS: Once you've earned a Nexus Level, go to the Cryo Pod Uplink in Nexus Ops or the research room of the Tempest to access the cryo pods screen and choose which pod you want to open.
Each cryo pod you open grants a gameplay benefit. Some of these benefits are instantaneous, while others offer recurring rewards over time.
Tip: Certain cryo pods can only be opened if you have high enough viability on specific worlds. See Planetary Viability.
CLAIMING REWARDS: To collect any outstanding rewards from your cryo pods, open the cryo pod screen (see above) and press (button).


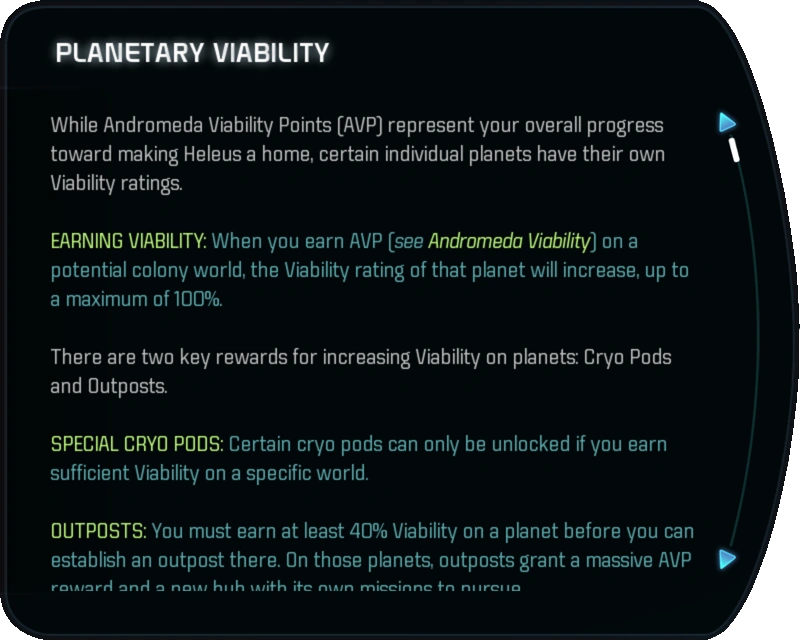
Planetary Viability[ | ]


Planetary Viability
While Andromeda Viability Points (AVP) represent your overall progress toward making Heleus a home, certain individual planets have their own Viability ratings.
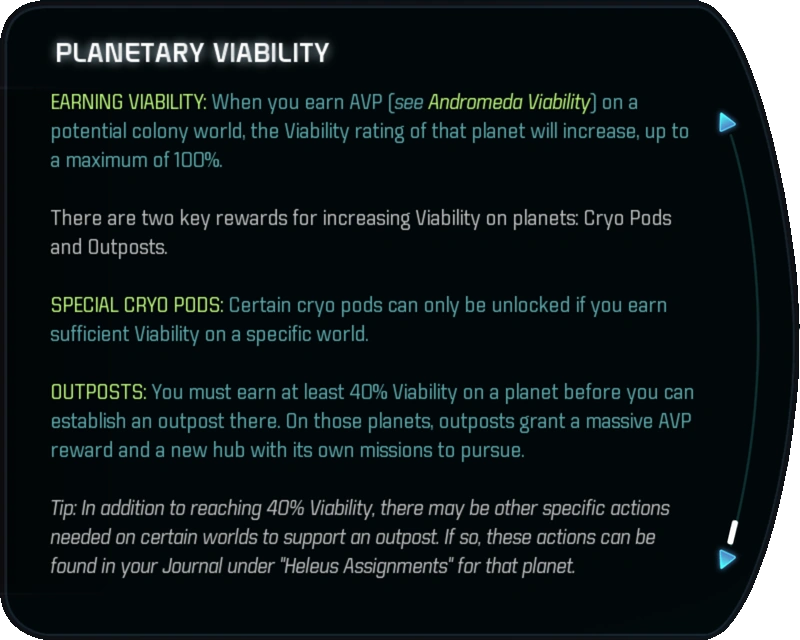
EARNING VIABILITY: When you earn AVP (see Andromeda Viability) on a potential colony world, the Viability rating of that planet will increase, up to a maximum of 100%.
There are two key rewards for increasing Viability on planets: Cryo Pods and Outposts.
SPECIAL CRYO PODS: Certain cryo pods can only be unlocked if you earn sufficient Viability on a specific world.
OUTPOSTS: You must earn at least 40% Viability on a planet before you can establish an outpost there. On those planets, outposts grant a massive AVP reward and a new hub with its own missions to pursue.
Tip: In addition to reaching 40% Viability, there may be other specific actions needed on certain worlds to support an outpost there. If so, these actions can be found in your Journal under "Heleus Assignments" for that planet.
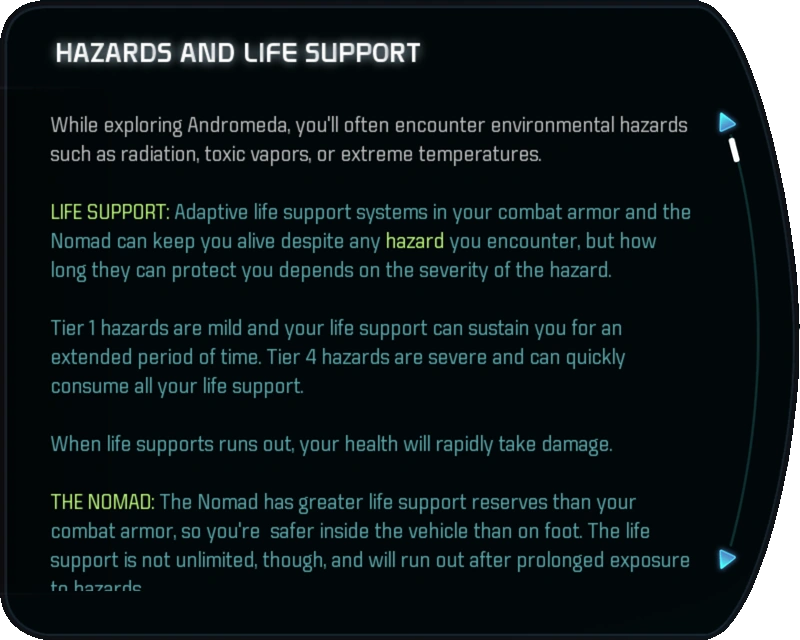
Hazards and Life Support[ | ]
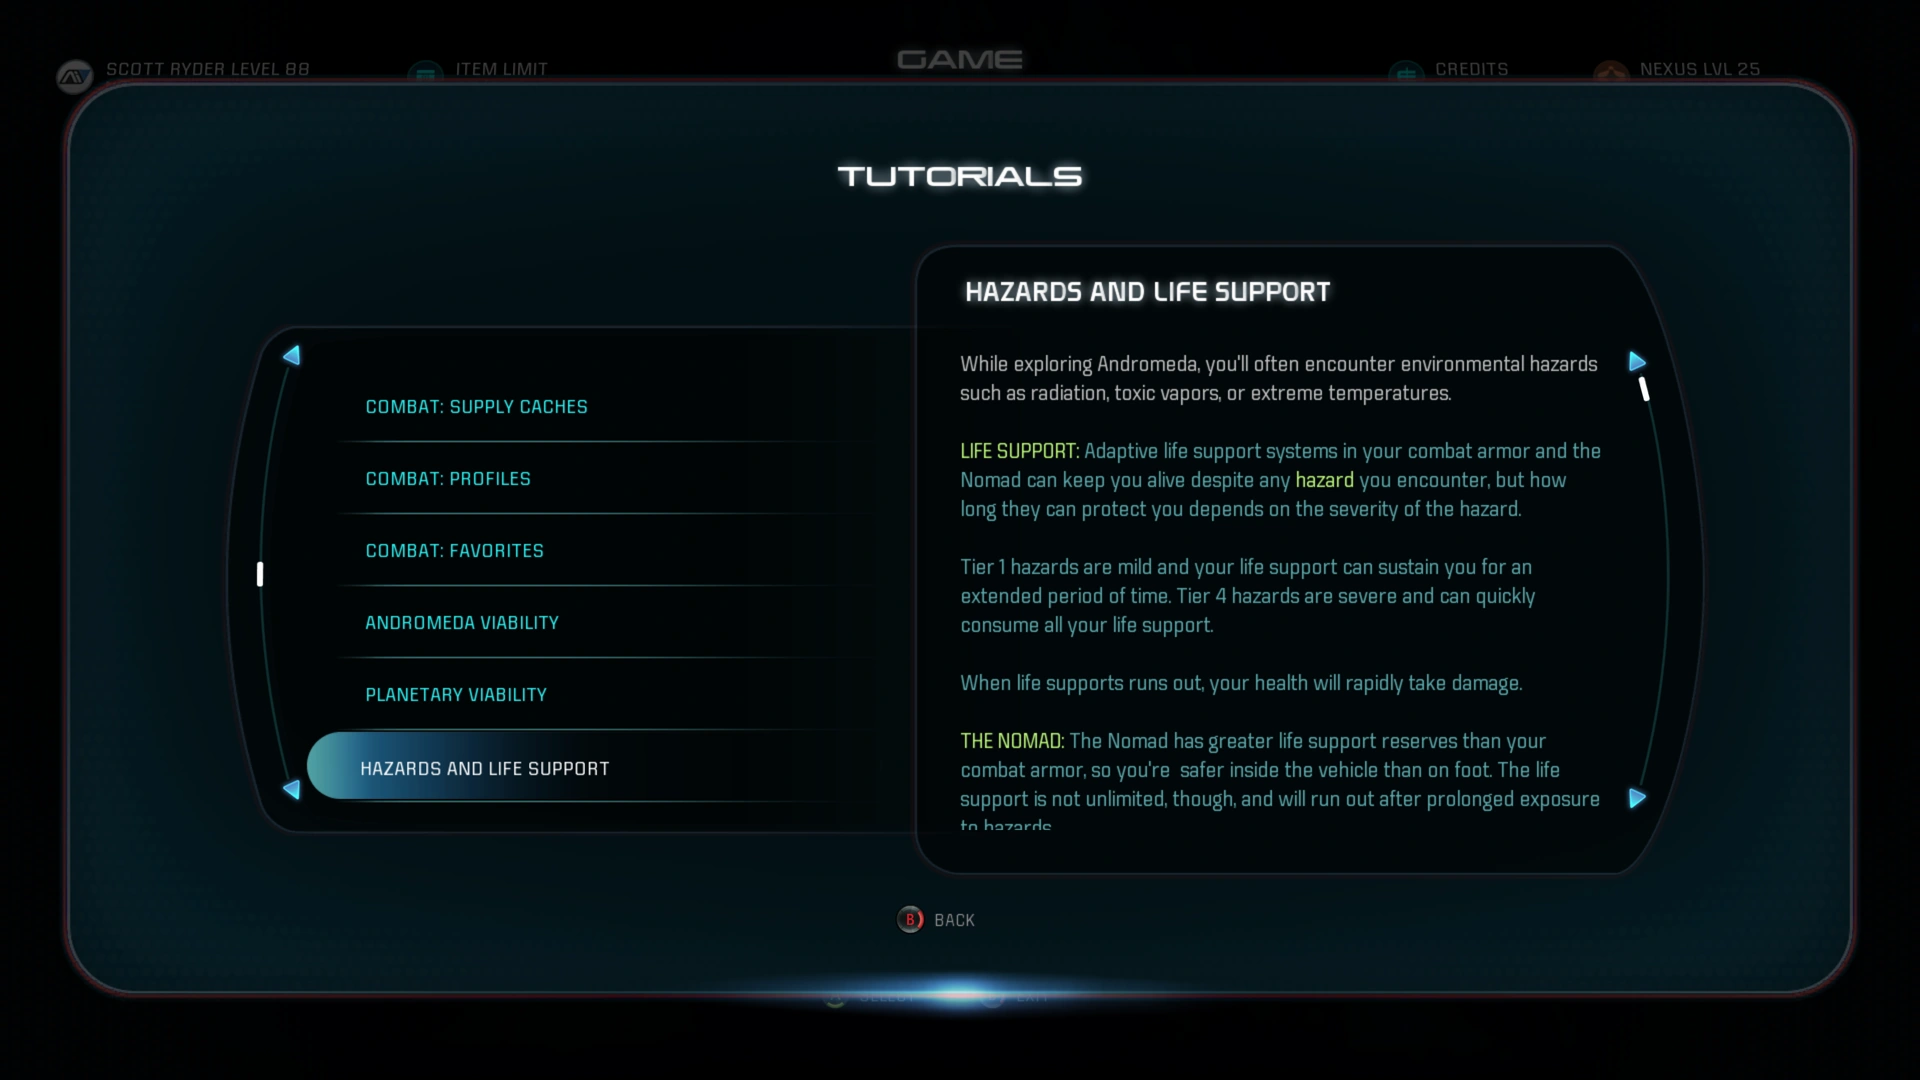
Hazards and Life Support
While exploring Andromeda, you'll often encounter environmental hazards such as radiation, toxic vapors, or extreme temperatures.
LIFE SUPPORT: Adaptive life support systems in your combat armor and the Nomad can keep you alive despite any hazard you encounter, but how long they can protect you depends upon the severity of the hazard.
Tier 1 hazards are mild and your life support can sustain you for an extended period of time. Tier 4 hazards are severe and can quickly consume all your life support.
When life support runs out, your health will rapidly take damage.
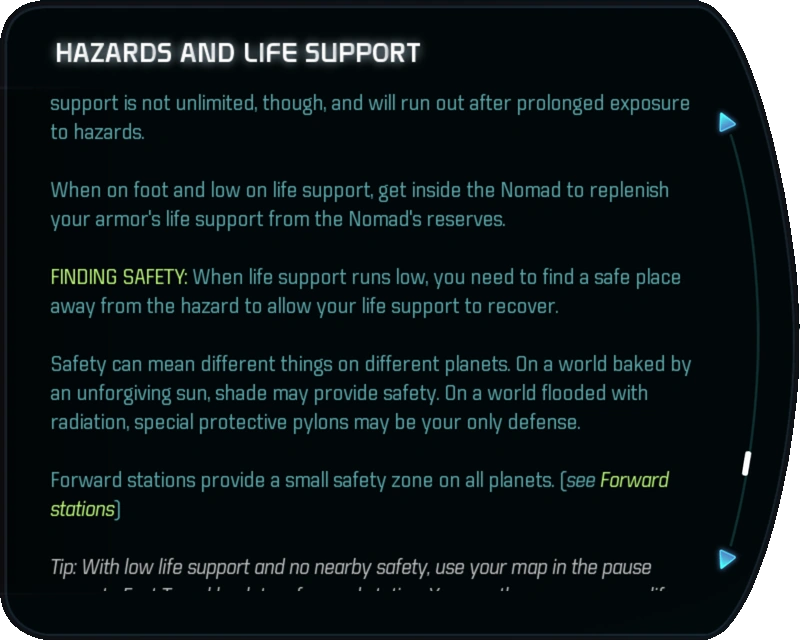
THE NOMAD: The Nomad has greater life support reserves than your combat armor, so you're safer inside the vehicle than on foot. The life support is not unlimited, though, and will run out after a prolonged exposure to hazards.
When on foot and low on life support, get inside the Nomad to replenish your armor's life support from the Nomad's reserves.
FINDING SAFETY: When life support runs low, you need to find a safe place away from the hazard to allow your life support to recover.
Safety can mean different things on different planets. On a world baked by an unforgiving sun, shade may provide safety. On a world flooded with radiation, special protective pylons may be your only defense.
Forward stations provide a small safety zone on all planets. (see Forward Stations)
Tip: With low life support and no nearby safety, use your map in the pause menu to Fast Travel back to a forward station. You can then recover your life support and summon the Nomad before venturing out again.

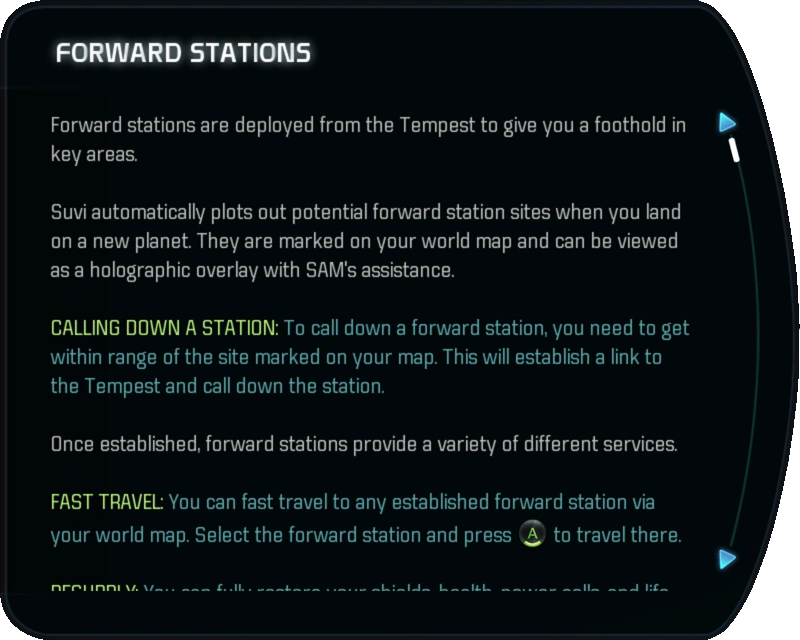
Forward Stations[ | ]


Forward Stations
Forward stations are deployed from the Tempest to give you a foothold in key areas.
Suvi plots out potential forward station sites when you land on a new planet. They are marked on your world map and can be viewed as a holographic overlay with SAM's assistance.
CALLING DOWN A STATION: To call down a forward station, you need to get within range of the site marked on your map. This will establish a link to the Tempest and call down the station.
Once established, forward stations provide a variety of different services.
FAST TRAVEL: You can fast travel to any established forward station via your world map. Select the forward station and press (button) to travel there.
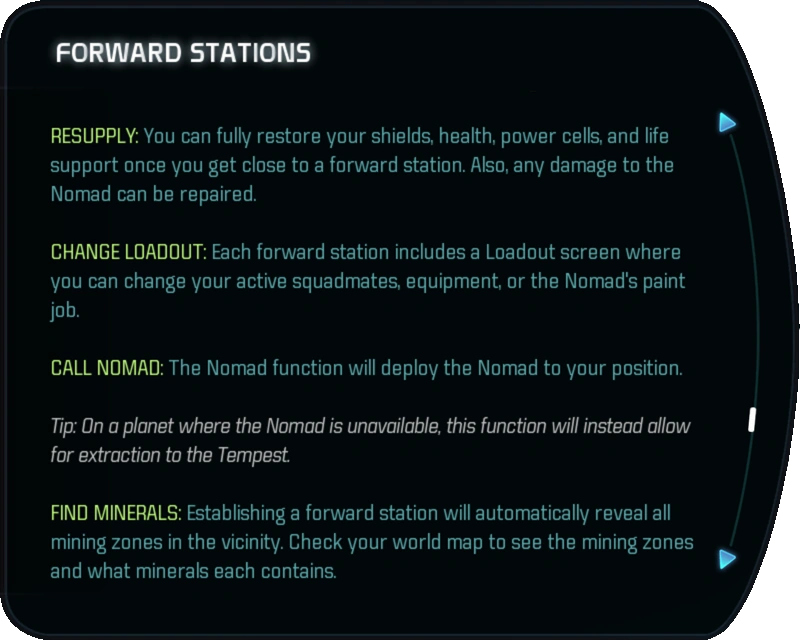
RESUPPLY: You can fully restore your shields, health, power cells, and life support once you get close enough to a forward station. Also, any damage to the Nomad can be repaired.
CHANGE LOADOUT: Each forward station includes a Loadout screen where you can change your active squadmates, equipment, or the Nomad's paint job.
CALL NOMAD: The Nomad function will deploy the Nomad to your position.
Tip: On a planet where the Nomad is unavailable, this function will instead allow for extraction to the Tempest.
FIND MINERALS: Establishing a forward station will automatically reveal all mining zones in the vicinity. Check your world map to see the mining zones and what minerals each contains.
Mining zones can be mined with the Nomad (see Crafting: Mining).
SENSOR LOGS: Sensor logs are available at most forward stations to provide information on nearby events.

The Nomad[ | ]


The Nomad
The ND1 Nomad is your all-terrain land vehicle for exploring alien worlds in Andromeda. For mining with the Nomad, see Crafting: Mining.
ENTERING/EXITING: To get inside the Nomad, approach either door and hold (button). To exit, press (button).
DRIVING: Use (button) to accelerate, (button) to slow or brake. Steer with (button).
JUMP: Use (button) to deploy the Nomad's jump-jets.
TURBO BOOST: Use (button) to engage the Nomad's turbo boost for a surge of speed.
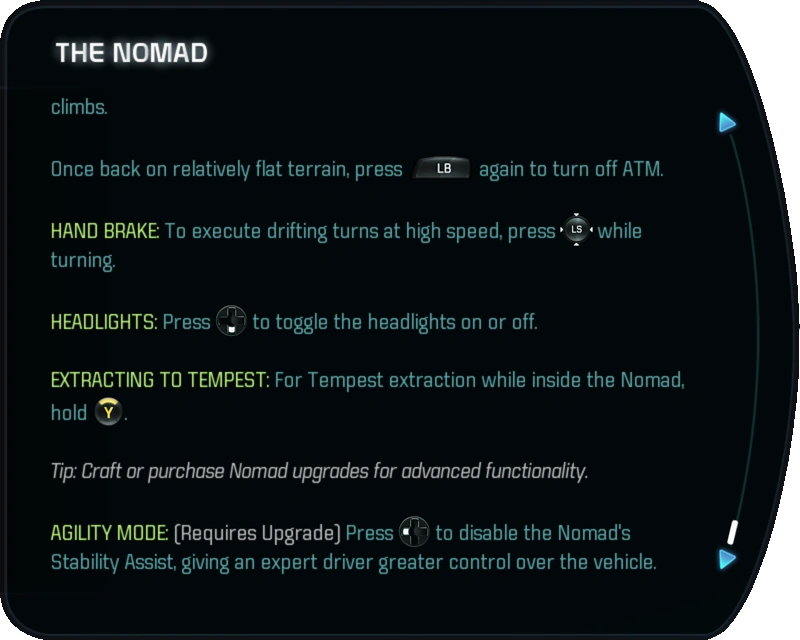
CLIMBING HILLS: To climb particularly steep inclines, press (button) to turn on the Nomad's All-Terrain Mode (ATM). While slow, it can handle steep climbs.
Once back on relatively flat terrain, press (button) again to turn off ATM.
HAND BRAKE: To execute drifting turns at high speed, press (button) while turning.
HEADLIGHTS: Press (button) to toggle the headlights on or off.
EXTRACTING TO TEMPEST: For Tempest extraction while inside the Nomad, hold (button).
Tip: Craft or purchase Nomad upgrades for advanced functionality.
AGILITY MODE: (Requires Upgrade) Press (button) to disable the Nomad's Stability Assist, giving an expert driver greater control over the vehicle.

World Map[ | ]


World Map
The world map lets you fast travel, track missions and see the areas you've explored. While inside a hub, it will also point out key characters.
USING THE MAP: To access the world map, press (button) to open the pause menu and (button) to select the map.
FOG OF WAR: On most maps, areas you have not yet explored are obscured by a "fog or war." This can help you determine which areas you're already visited.
LEVELS: When in an area with multiple levels, press (button)/(button) to view the different levels of the map.
FAST TRAVEL: Any location with a ![]() icon can be accessed by Fast Travel. Select one and press (button) to travel there.
icon can be accessed by Fast Travel. Select one and press (button) to travel there.
Tip: While exploring a new world, the Tempest and any established forward stations can be used for fast travel.
TRACKING MISSIONS: Missions in the area will apeear on your map whether you're tracking them or not. To change the quest you're tracking, select an icon for an untracked question and press (button).
WAYPOINTS: To set a waypoint that appears on your compass at any distance, select a spot on the map and press (button). Select your waypoint and press (button) again to remove it.
LEGEND: Press (button) to show or hide the legend, which explains the various icons on the map.


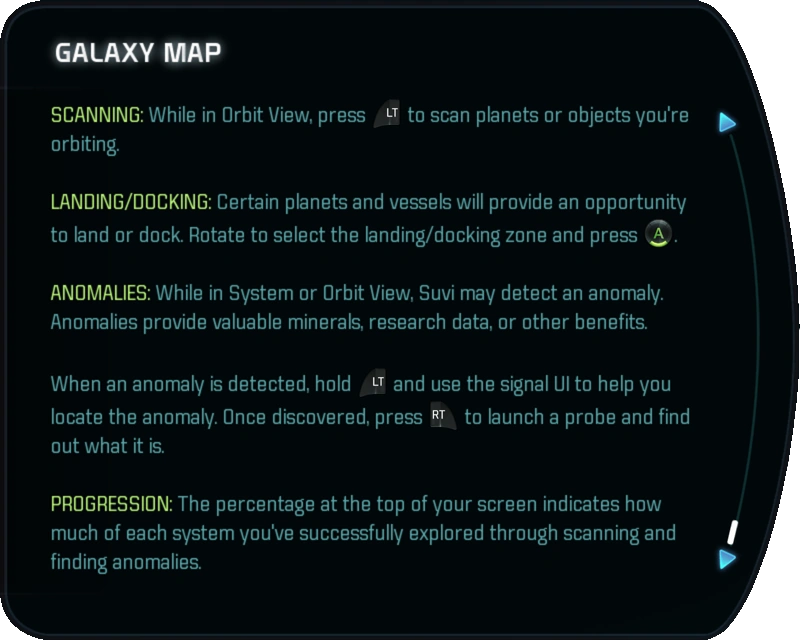
Galaxy Map[ | ]
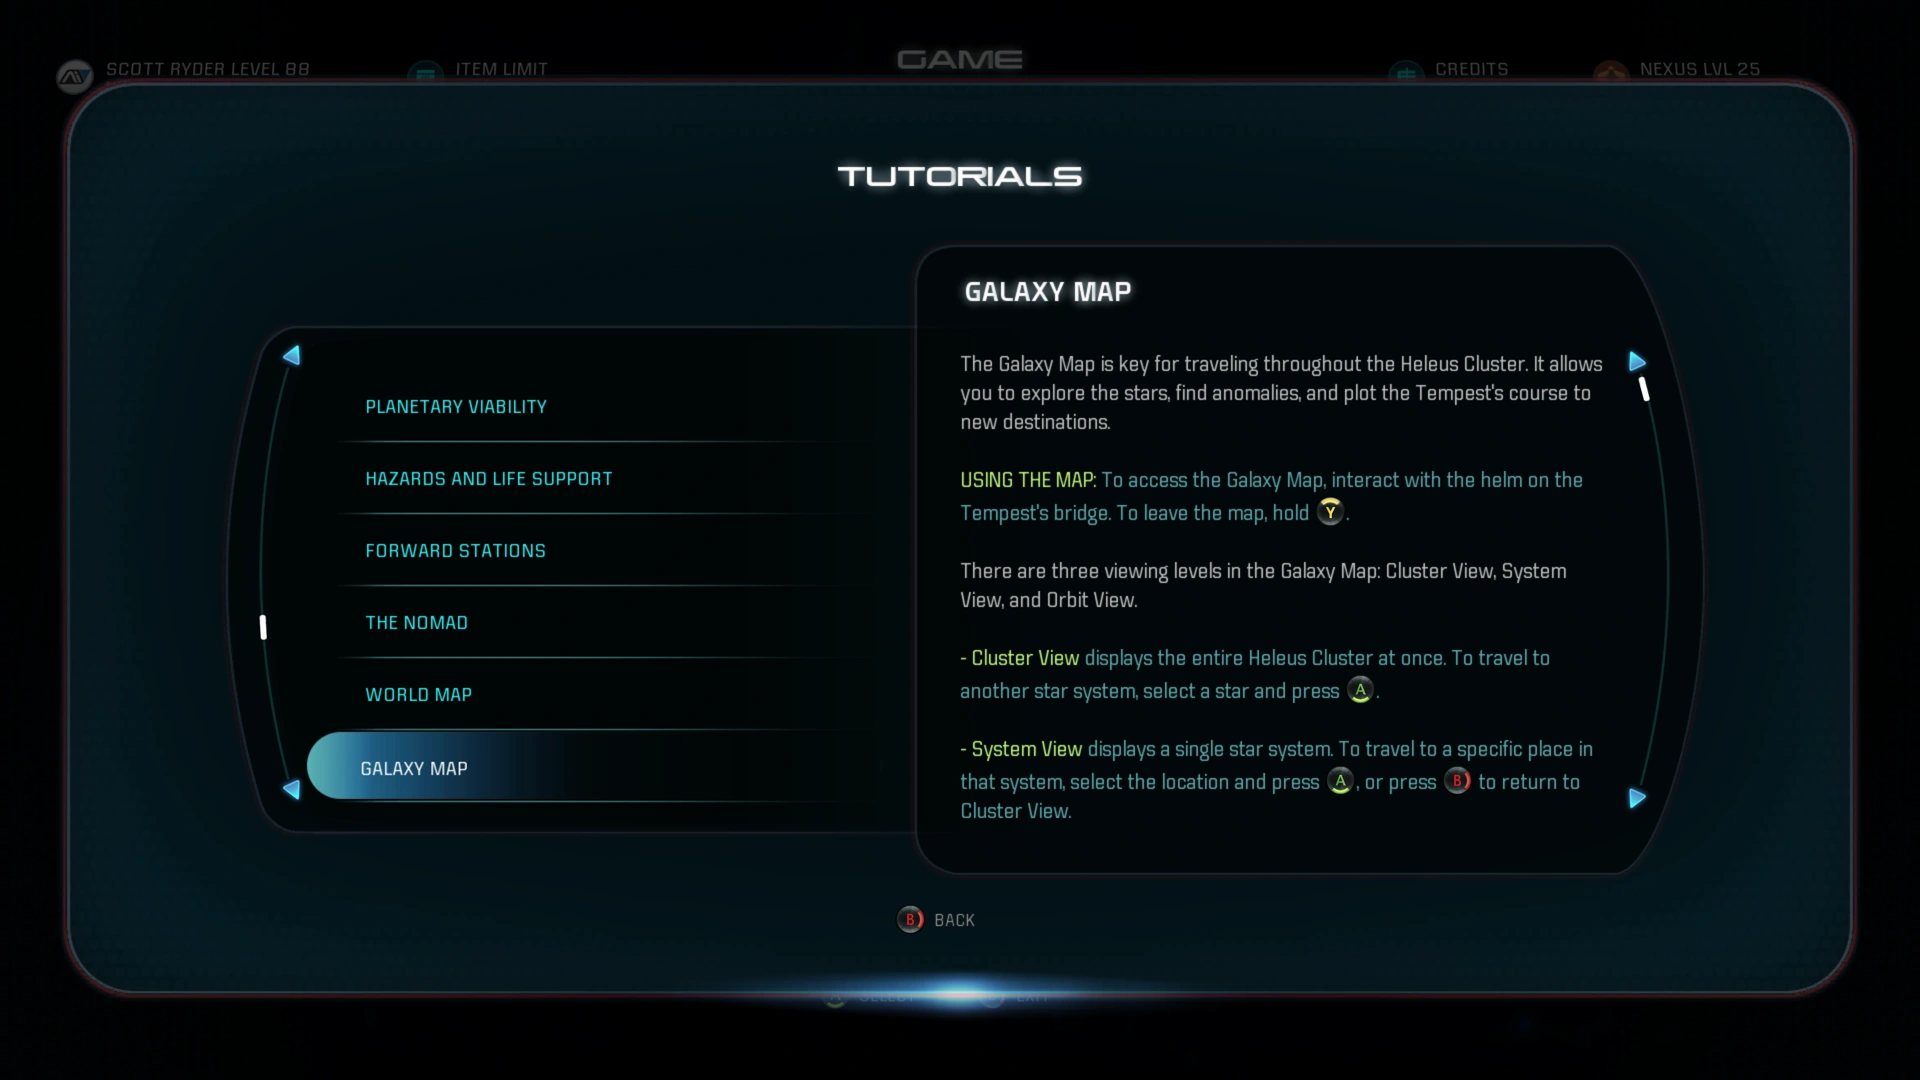

Galaxy Map
The Galaxy Map is key for travelling throughout the Heleus Cluster. It allows you explore the stars, find anomalies, and plot the Tempest's course to new destinations.
USING THE MAP: To access the Galaxy Map, interact with the helm on the Tempest's bridge. To leave the map, hold (button).
There are three viewing levels in the galaxy map: Cluster View, System View, and Orbit View.
- Cluster View displays the entire Heleus Cluster at once. To travel to another star system, select a star and press (button).
- System View displays a single star system. To travel to a specific place in that system, select the location and press (button), or press (button) to return to the Cluster View.
- Orbit View displays a single planet or vessel when you're directly in orbit. Press (button) to return to System View.
SCANNING: While in Orbit View, press (button) to scan planets or objects you're orbiting.
LANDING/DOCKING: Certain planets and vessels will provide an opportunity to land or dock. Rotate to select the landing/docking zone and press (button).
ANOMALIES: While in System or Orbit View, Suvi may detect an anomaly. Anomalies provide valuable minerals, research data, or other benefits.
When an anomaly is detected, hold (button) and use the signal UI to help you locate the anomaly. Once discovered, press (button) to launch a probe and find out what it is.
PROGRESSION: The percentage at the top of your screen indicates how much of each system you've successfully explored through scanning and finding anomalies.


Journal and Codex[ | ]


Journal and Codex
The Journal is located in the pause menu. It lists the missions and tasks you've acquired. It allows you to mark a single mission for easy tracking.
The Journal is organized into the following categories.
- Priority Ops: These are missions critical to progressing through the game's main story.
- Allies and Relationships: These are missions personally important to Ryder or key allies. Loyalty missions are found in this category. (see Combat: Squadmates)
- Heleus Assignments: These are optional missions you'll acquire through Heleus. They are divided into subctaegories based on where you found them.
- Additional Tasks: These are small assignments or collectibles, helpful for gaining additional resources.
- Completed Missions: All completed missions and tasks appear here.
TRACKING A MISSION: To track a mission, select it from the Journal and press (button). Hit (button) again to stop tracking it. Only one mission can be tracked at a time.
When tracked, most missions have objective markers that appear on your world map, galaxy map, and compass.
They will also appear in-world within a certain range, or whenever you press (button) while standing still.
The Codex allows you to peruse the lore of the Mass Effect universe. New entries are added to the Codex as you explore, scan, and make progress through the story.
THE JOURNEY SO FAR... This special section at the beginning of the Codex describes the key choices, relationships, and distinctive personality you've made for Ryder.


Loadout: Weight and Mods[ | ]


Loadout: Weight and Mods
Loadout terminals allow you to change or modify your active equipment, choose squadmates, and customize the Nomad's look.
A terminal is shown when deploying on a mission. It can also be accessed at a forward station or the Tempest's airlock.
NAVIGATING THE MENU: Press (button) / (button) to navigate through the four tabs of the Loadout screen.
On your chosen page, highlight a slot and press (button) to select it, then choose the item or person you want in that slot and press (button). Press (button) to cancel. Select an item and press (button) to unequip it.
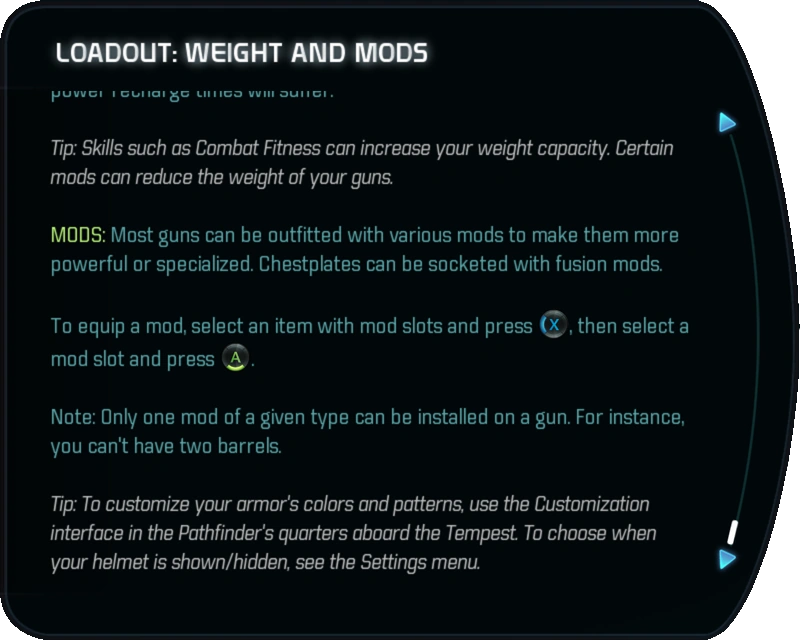
WEAPON WEIGHT: Melee weapons are effectively weightless, but each gun in your loadout adds more weight. If you carry too much weight, your power recharge times will suffer.
Tip: Skills such as Combat Fitness can increase your weight capacity. Certain mods can reduce the weight of your guns.
MODS: Most guns can be outfitted with various mods to make them more powerful or specialized. Chestplates can be socketed with fusion mods.
To equip a mod, select an item with mod slots and press (button), then select a mod slot and press (button).
Note: Only one mod of a given type can be installed on a gun. For instance, you can't have two barrels.
Tip: To customize your armor's colors and patterns, use the Customization interface in the Pathfinder's quarters aboard the Tempest. To choose when your helmet is shown/hidden, see the Settings menu.

Crafting: Finding Minerals[ | ]


Crafting: Finding Minerals
MATERIAL TYPES: Crafting materials come in three basic types.
- Minerals - Natural geological materials such as platinum and iridium. Minerals may be found while exploring a planet's surface or by finding anomalies while on the Tempest.
- Bio Materials - Bits of indigenous animal life you encounter in Heleus. Creatures can be hunted for these materials.
- Tech Materials - Specific items crafted by one of the sapient races. They are generally found in artificial environments.
Tip: Most materials can also be purchased from certain merchants.
MINERAL NODES: Mineral nodes are small deposits of certain minerals which can be harvested with Ryder's omni-tool.
MINING ZONES: Mining zones are areas that feature large subterranean mineral deposits which can only be mined with the Nomad.
When you establish a forward station, all mining zones in the vicinity will be added to your world map and compass.
MINING COMPUTER: Drive the Nomad inside a mining zone and press (button) to activate your mining computer. It will inform you which minerals can be found at your location, mineral quantities, and the amount of minerals remaining in the zone.
Press (button) again to deactivate the mining display.
MINING DRONES: When the Nomad is near a large amount of minerals, hit (button) to drop a mining drone that will consume all valuable minerals in the immediate area.
Tip: You can drop as many mining drones in a mining zone as you like, but they cannot be too close together—choose your placement carefully for the greatest yield.


Crafting: Research[ | ]


Crafting: Research
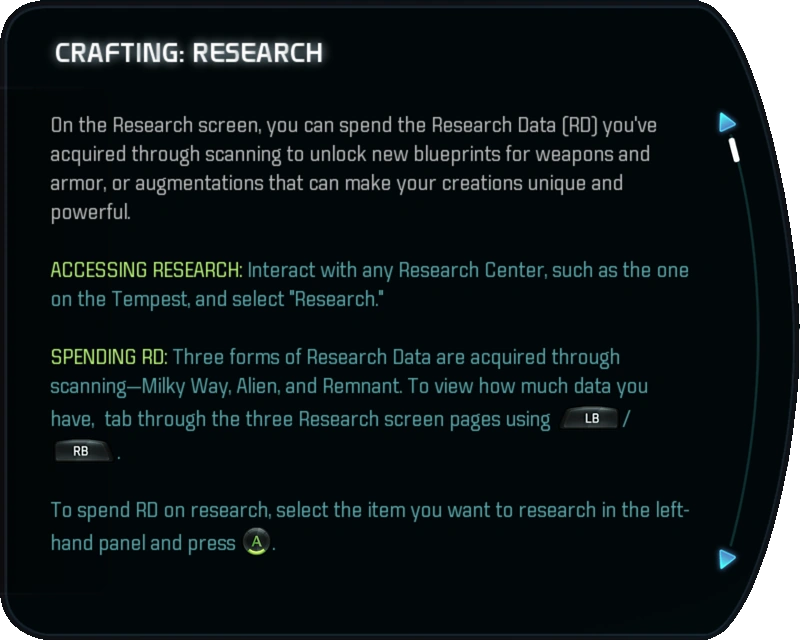
On the Research screen, you can spend the Research Data (RD) you've acquired through scanning to unlock new blueprints for weapons and armor, or augmentations that can make your creations unique and powerful.
ACCESSING RESEARCH: Interact with any Research Center, such as the one on the Tempest, and select "Research".
SPENDING RESEARCH: Three forms of Research Data are acquired through scanning—Milky Way, Alien, and Remnant. To view how much data you have, tab through the three Research screen pages using (button) / (button).
To spend RD on research, select the item you want to research in the left-hand panel and press (button).
UNLOCKING BLUEPRINTS: When a new blueprint is researched, it will appear on the Development screen. It can then be crafted, provided you have the necessary materials.
UNLOCKING AUGMENTATIONS: When a new augmentation is researched, you'll receive one immediately. You can then use the augmentation during crafting on the Development screen.
Additionally, Ryder will then know what to look for in the wild and can find that researched augmentation while exploring.

Crafting: Development[ | ]


Crafting: Development
You can craft new weapons, armor, and Nomad upgrades using blueprints and materials on the Development screen.
ACCESSING DEVELOPMENT: To access the Development screen, interact with any Research Center, such as the one on the Tempest, and select "Develop."
NAVAGATING THE MENU: The Development screen is divided into four tabs which can be navigated with (button) / (button).
- Ready to Develop: All blueprints you currently have the necessary materials to build.
- Weapons: Melee weapons and firearms.
- Armor: Helmets and body armor.
- Nomad: Permanent upgrades for the Nomad.
- Special Items: Unique items required for certain missions.
CRAFTING ITEMS: Navigate to an item you want to build, and—if you have the required materials—press (button) to create it.
If you don't have all of the required materials, press (button) to get information on how those materials can be acquired.
When you create an item, you'll have an opportunity to give it a custom name.
USING AUGMENTATIONS: Most blueprints at Rank 2 or higher have augmentation slots for special devices that can be incorporated into a gun or armor piece during the crafting process. These augmentations boost stats or profoundly change an item's behavior.
To use an augmentation, press (button) to select an augmentation slot and choose which one you want to use. Once you're satisfied with your selected augmentations, press (button) to craft the item.


Remnant Interfacing[ | ]


Remnant Interfacing
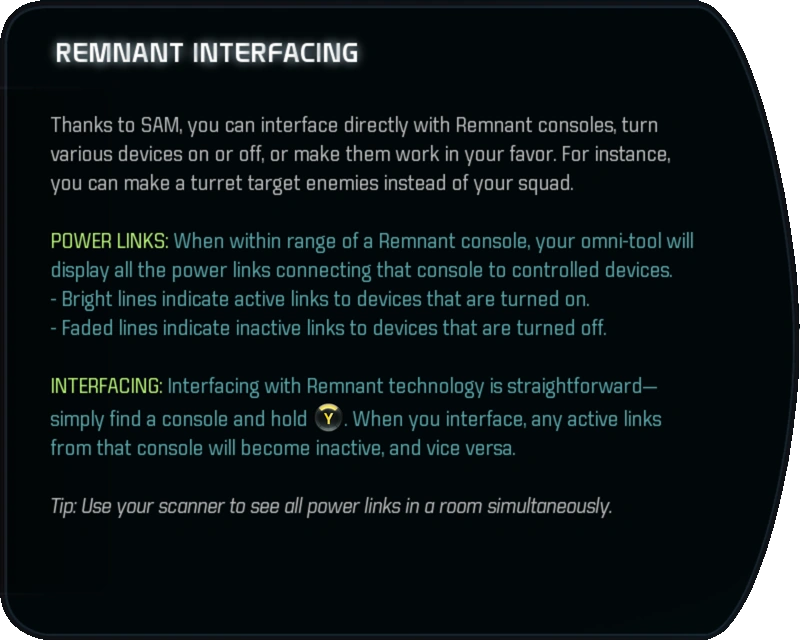
Thanks to SAM, you can directly interface with Remnant consoles, turn various devices on or off, or make them work in your favor. For instance, you can make a turret target enemies instead of your squad.
POWER LINKS: When within range of a Remnant console, your omni-tool will display all the power links connecting that console to controlled devices.
- Bright lines indicate active links to devices that are turned on.
- Faded lines indicate inactive links to devices that are turned off.
INTERFACING: Interfacing with Remnant technology is straightforward—simply find a console and hold (button). When you interface, any active links from that console will become inactive, and vice versa.
Tip: Use your scanner to see all power links in a room simultaneously.
Remnant Decryption[ | ]


Remnant Decryption
Remnant Decryption involves completing strange Remnant glyph puzzles to activate a console or access hidden valuables.
MISSING GLYPHS: Each Remnant puzzle contains a series of glyphs laid out in a grid-like pattern. If you see any ? symbols in the grid, it means one or more glyphs is missing. You'll need to find them before solving the puzzle.
Scan nearby surroundings for glyphs. Underground currents from the puzzle console often connect to the missing glyphs. Once you find them all, you can attempt the puzzle.
SOLVING PUZZLES: To decrypt a Remnant glyph puzzle, you must place glyphs into the blank spaces on the grid.
To successfully solve it, you must follow these rules:
1) The same glyph cannot appear more than once in the same row.
2) The same glyph cannot appear more than once in the same column.
3) The same glyph cannot appear more than once in the same outlined shape. Different puzzles may have different shapes.
Press (button) once you think you've solved the puzzle, or (button) to reset the puzzle back to its original state. Be careful: submitting the wrong solution may have dire consequences!
DECRYPTION KEYS: Remnant Decryption keys are rare consumable items that can bypass a glyph puzzle completely. Press (button) to use a decryption key—if you have one.


APEX & Strike Teams[ | ]


APEX & Strike Teams
APEX is the militia for the Milky Way colonists. APEX is comprised of strike teams who undertake missions to protect the colonists and their interests in Andromeda.
ACCESSING STRIKE TEAMS: Access your strike teams from consoles found in the APEX HQ on the Nexus and the Tempest. Strike Teams can also be accessed from within Multiplayer mode.
Tip: You can also access Strike Teams from the APEX HQ app, available at your app store.
NAVIGATING THE MENU: The Strike Teams interface has three tabs: Missions, Teams, and Pathfinder Rewards.
MISSIONS: This page lists all available missions, their challenge rating, what Traits they possess, how long they take, and how much time is left before they expire.
Missions marked with ![]() can be performed by regular strike teams or you can play them yourself in Multiplayer for additional rewards.
can be performed by regular strike teams or you can play them yourself in Multiplayer for additional rewards.
TEAMS: This page shows the Strike Teams you've recruited, Traits they've acquired, and their progress toward leveling up. You can purchase gear for your Strike Teams here using Mission Funds, or retire teams you don't like.
TRAITS: Missions possess certain Traits which make them easier or harder for Strike Teams. Strike Teams may acquire positive traits for successful missions and negative traits for failed missions.
CLAIMING REWARDS: Completed missions—successes or failures—appear in the Missions list. Select a Mission and press (button) to debrief the team and use them again.
Ryder can collect special rewards on the "Pathfinder Rewards" tab.


Notes[ | ]
There are a few items in the Tutorials sections that don't match or are inaccurate to what is used during gameplay. These are usually minor switches of words or terminology and don't affect the concept being explained in the applicable section. For example - the symbol for a health supply cache is ![]() and not
and not ![]() .
.